NOTE: Apart from

You can see how this translation was done in this article.
Friday, 13 September 2024
//4 minute read
在此应用程序中,我想添加一个模拟机制, 允许登录在应用程序中添加评论( 和一些行政任务) 。 我想为此使用 Google Auth 。 我不想为此使用 ASP. NET 身份数据库 。 我想尽可能长地保持应用程序的简单 。
数据库是任何应用程序的强大组成部分,但它们也增加了复杂性。 我想避免这种复杂性,直到我真正需要它。
[技选委
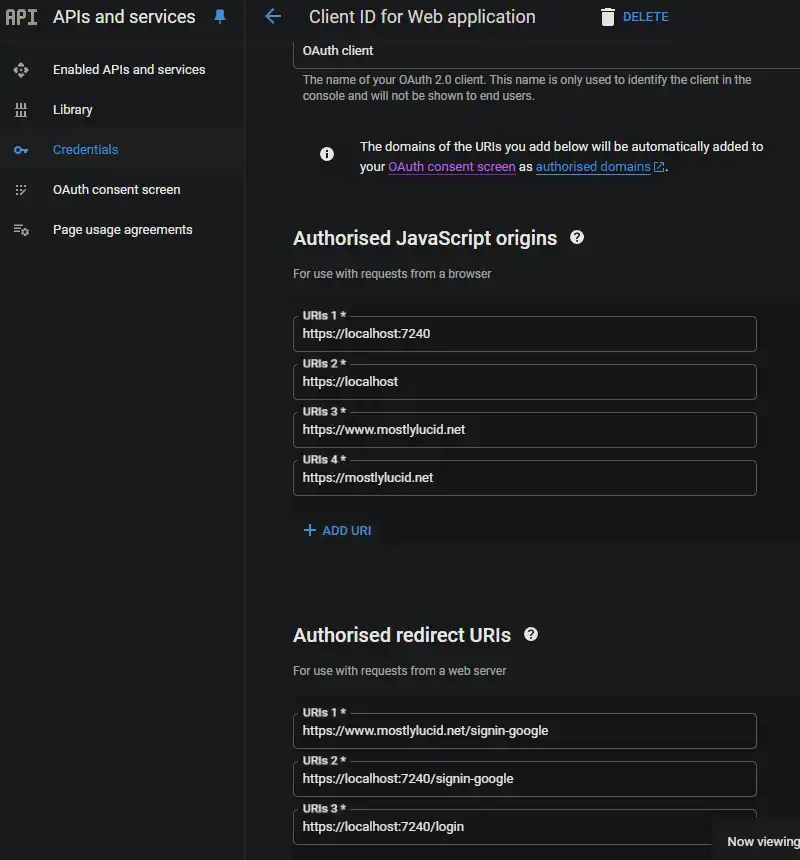
首先,您需要在 Google 开发者控制台设置 Google Auth 。 您可以跟随此步骤链接链接来为您设置您的详细信息 谷歌客户身份和秘密。
一旦您有您的 Google 客户端身份和秘密, 您可以将其添加到您的 apggings.json 文件 。
    "Auth" :{
"GoogleClientId": "",
"GoogleClientSecret": ""
}
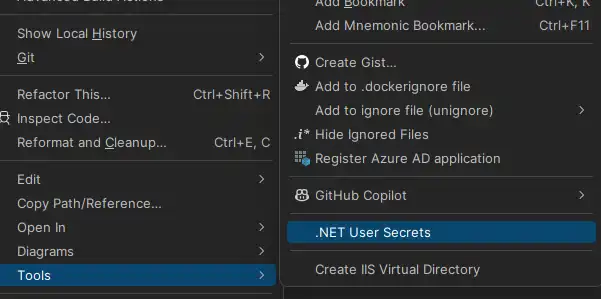
您如何不要检查这些内容到源控制 。 相反, 本地开发您可以使用“ 秘密” 文件 :

里面可以加上你的Google客户身份和秘密(请注意,你的客户Id实际上并不保密,因为你以后会看到它被列入联署材料前端的电话中。
    "Auth" :{
  "GoogleClientId": "ID",
  "GoogleClientSecret": "CLIENTSECRET"
}
Steve Smith的IConfig部分(最近由Phil Haack出名)的修改版本。 这是为了避免我发现有点笨拙(而且很少需要, 因为在我的假想中部署后, 我几乎从未改变配置),
在我的课里,我这样做, 让我能从班上获得分节名称:
namespace Mostlylucid.Config;

public static class ConfigExtensions {
    public static TConfig ConfigurePOCO<TConfig>(this IServiceCollection services, IConfiguration configuration)
        where TConfig : class, new() {
        if (services == null) throw new ArgumentNullException(nameof(services));
        if (configuration == null) throw new ArgumentNullException(nameof(configuration));

        var config = new TConfig();
        configuration.Bind(config);
        services.AddSingleton(config);
        return config;
    }

    public static TConfig Configure<TConfig>(this WebApplicationBuilder builder)
        where TConfig : class, IConfigSection, new() {
        var services = builder.Services;
        var configuration = builder.Configuration;
        var sectionName = TConfig.Section;
        return services.ConfigurePOCO<TConfig>(configuration.GetSection(sectionName));
    }


    public static TConfig GetConfig<TConfig>(this WebApplicationBuilder builder)
        where TConfig : class, IConfigSection, new() {
        var configuration = builder.Configuration;
        var sectionName = TConfig.Section;
        var section = configuration.GetSection(sectionName).Get<TConfig>();
        return section;

    }

    public static Dictionary<string, object> GetConfigSection(this IConfiguration configuration, string sectionName) {
        var section = configuration.GetSection(sectionName);
        var result = new Dictionary<string, object>();
        foreach (var child in section.GetChildren()) {
            var key = child.Key;
            var value = child.Value;
            result.Add(key, value);
        }

        return result;
    }

    public static Dictionary<string, object> GetConfigSection<TConfig>(this WebApplicationBuilder builder)
        where TConfig : class, IConfigSection, new() {
        var configuration = builder.Configuration;
        var sectionName = TConfig.Section;
        return configuration.GetConfigSection(sectionName);
    }
}

public interface IConfigSection {
    public static abstract string Section { get; }
}
public class Auth : IConfigSection
{
    public static string Section => "Auth";
    public string GoogleClientId { get; set; }
    public string GoogleClientSecret { get; set; }

    public string AdminUserGoogleId { get; set; }

}
在那里我使用静态界面方法获得区域名称。
然后在我的开办阶段,我可以做到这一点:
var auth = builder.GetConfig<Auth>();
任何回到谷歌的东西!
以实际添加此内容
services.AddCors(options =>
{
    options.AddPolicy("AllowMostlylucid",
        builder =>
        {
            builder.WithOrigins("https://www.mostlylucid.net")
                .WithOrigins("https://mostlylucid.net")
                .WithOrigins("https://localhost:7240")
                .AllowAnyHeader()
                .AllowAnyMethod();
        });
});

builder.Services
    .AddAuthentication(options =>
    {
        options.DefaultScheme = CookieAuthenticationDefaults.AuthenticationScheme;
        options.DefaultChallengeScheme = GoogleDefaults.AuthenticationScheme;


    })
    .AddCookie()
    .AddGoogle(options =>
    {
        options.ClientId = auth.GoogleClientId;
        options.ClientSecret = auth.GoogleClientSecret;
    });
你会注意到这里有CORS的条目, 你也需要设置这些 在谷歌身份控制台。

这将确保 Google Auth 只能从您指定的域中使用 。
在我的_布局. cshtml 我有这个 Javascript, 这就是我设置 Google 按钮的地方, 并触发回调, 记录 ASP. NET 应用程序 。
<script src="https://accounts.google.com/gsi/client" async defer></script>
这是下面代码的下方
        function renderButton(element)
        {
            google.accounts.id.renderButton(
                element,
                {
                    type: "standard",
                    size: "large",
                    width: 200,
                    theme: "filled_black",
                    text: "sign_in_with",
                    shape: "rectangular",
                    logo_alignment: "left"
                }
            );
        }
        function initGoogleSignIn() {
            google.accounts.id.initialize({
                client_id: "839055275161-u7dqn2oco2729n6i5mk0fe7gap0bmg6g.apps.googleusercontent.com",
                callback: handleCredentialResponse
            });
            const element = document.getElementById('google_button');
            if (element) {
                renderButton(element);
            }
            const secondElement = document.getElementById('google_button2');
            if (secondElement) {
                renderButton(secondElement);
            }

        }

        function handleCredentialResponse(response) {
            if (response.credential) {
                const xhr = new XMLHttpRequest();
                xhr.open('POST', '/login', true);
                xhr.setRequestHeader('Content-Type', 'application/json');
                xhr.onload = function () {
                    if (xhr.status === 200) {
                        window.location.reload();
                    } else {
                        console.error('Failed to log in.');
                    }
                };
                xhr.send(JSON.stringify({ idToken: response.credential }));
            } else {
                console.error('No credential in response.');
            }
        }

        window.onload = initGoogleSignIn;
在这里,您可以看到我在页面中有多达两个 div 元素, 包括 id Google_ button 和 Google_ button 2 。 这些元素是谷歌联署材料将把按钮转换成的 。
TIP: 如果您正在使用尾风, 您可以按下按钮 div 来在暗模式下正确工作( 否则它会使按钮周围的白背景变为白背景) 。
<div class="w-[200px] h-[39px] overflow-hidden rounded">
    <div id="google_button">
    </div>
</div>
在上方的 JavaScript 中,我把这个发回给一个叫做登录的主计长行动。这里是我处理Google Auth 的地方。
      const xhr = new XMLHttpRequest();
                xhr.open('POST', '/login', true);
                xhr.setRequestHeader('Content-Type', 'application/json');
                xhr.onload = function () {
                    if (xhr.status === 200) {
                        window.location.reload();
                    } else {
                        console.error('Failed to log in.');
                    }
                };
                xhr.send(JSON.stringify({ idToken: response.credential }));
主计长在这里,这很简单,它只需要 张贴的JWT, 解码它然后使用它 登录到应用程序。
    [Route("login")]
        [HttpPost]
        public async Task<IActionResult> HandleGoogleCallback([FromBody] GoogleLoginRequest request)
        {
            var handler = new JwtSecurityTokenHandler();
            var jsonToken = handler.ReadToken(request.IdToken) as JwtSecurityToken;

            if (jsonToken == null)
            {
                return BadRequest("Invalid token");
            }

            var claimsIdentity = new ClaimsIdentity(
                jsonToken.Claims,
                GoogleDefaults.AuthenticationScheme);

            var authProperties = new AuthenticationProperties
            {
                IsPersistent = true
            };

            await HttpContext.SignInAsync(
                CookieAuthenticationDefaults.AuthenticationScheme,
                new ClaimsPrincipal(claimsIdentity),
                authProperties);

            return Ok();
        }
    }
注意:这不是省政府 因为它透露了索赔名称(他们都是低级案件) 但它目前有效。
在我的基地主计长 我提取我所需要的财产
      public record LoginData(bool loggedIn, string? name, string? avatarUrl, string? identifier);

    protected LoginData GetUserInfo()
    {
        var authenticateResult = HttpContext.AuthenticateAsync(CookieAuthenticationDefaults.AuthenticationScheme).Result;
        if (authenticateResult.Succeeded)
        {
            var principal = authenticateResult.Principal;
            if(principal == null)
            {
                return new LoginData(false, null, null, null);
            }
            var name = principal.FindFirst("name").Value;
            var avatarUrl =principal.FindFirst("picture").Value;
            var nameIdentifier = principal.FindFirst("sub");
            return new LoginData(true, name, avatarUrl, nameIdentifier?.Value);
        }
        return new LoginData(false,null,null,null);
    }
这就允许您使用 Google 身份验证而不使用 ASP. NET 身份数据库 。