NOTE: Apart from

You can see how this translation was done in this article.
Wednesday, 07 August 2024
//5 minute read
Questo è un articolo abbastanza semplice ma coprirà alcune delle odness di usare FluentEmail in ASP.NET Core per inviare email HTML che non ho visto altrove.
L'invio di messaggi HTML è un po' semplice con SmtpClient, ma non è molto flessibile e non supporta cose come template o allegati. FluentEmail è un'ottima libreria per questo, ma non è sempre chiaro come usarlo in ASP.NET Core.
FluentEmail con Razorlight (è integrato) consente di modellare le tue email utilizzando la sintassi Razor. Questo è grande in quanto consente di utilizzare il pieno potere di Rasoio per creare le tue email.
In primo luogo, è necessario installare FluentEmail.Core, FluentEmail.Smtp & FluentEmail.
dotnet add package FluentEmail.Core
dotnet add package FluentEmail.Smtp
dotnet add package FluentEmail.Razor
Per tenere le cose separate ho creato un'estensione IServiceCollection che imposta i servizi FluentEmail:
namespace Mostlylucid.Email;

public static class Setup
{
    public static void SetupEmail(this IServiceCollection services, IConfiguration config)
    {
          var smtpSettings = services.ConfigurePOCO<SmtpSettings>(config.GetSection(SmtpSettings.Section));

        services.AddFluentEmail(smtpSettings.SenderEmail, smtpSettings.SenderName)
            .AddRazorRenderer();

        services.AddSingleton<ISender>(new SmtpSender( () => new SmtpClient()
        {
            DeliveryMethod = SmtpDeliveryMethod.Network,
            Host = smtpSettings.Server,
            Port = smtpSettings.Port,
            Credentials = new NetworkCredential(smtpSettings.Username, smtpSettings.Password),
            EnableSsl = smtpSettings.EnableSSL,
            UseDefaultCredentials = false
        }));
        services.AddSingleton<EmailService>();

    }

}
##Impostazioni SMTP
Come vedrete ho anche usato il metodo IConfigSection menzionato nel mio Articolo precedente per ottenere le impostazioni SMTP.
var smtpSettings = services.ConfigurePOCO<SmtpSettings>(config.GetSection(SmtpSettings.Section));
Questo viene dal file appsettings.json:
"SmtpSettings":
  {
    "Server": "smtp.gmail.com",
    "Port": 587,
    "SenderName": "Mostlylucid",
    "Username": "",
    "SenderEmail": "[email protected]",
    "Password": "",
    "EnableSSL": "true",
    "EmailSendTry": 3,
    "EmailSendFailed": "true",
    "ToMail": "[email protected]",
    "EmailSubject": "Mostlylucid"

  }
Nota: per Google SMTP se si utilizza MFA (che si *davvero se hai bisogno di fare un app password per il tuo account.
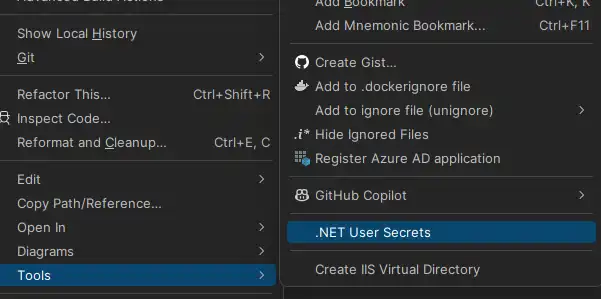
Per dev locale, puoi aggiungerlo al tuo file secrets.json:

Per docker comporre l'uso si dovrebbe normalmente includere questo in un file.env:
SMTPSETTINGS_USERNAME="[email protected]"
SMTPSETTINGS_PASSWORD="<MFA PASSWORD>" -- this is the app password you created
Poi nel docker componete il file che iniettate come variabili env:
services:
  mostlylucid:
    image: scottgal/mostlylucid:latest
    ports:
      - 8080:8080
    environment:
      - SmtpSettings__UserName=${SMTPSETTINGS_USERNAME}
      - SmtpSettings__Password=${SMTPSETTINGS_PASSWORD}
Prendi nota della spaziatura come questo può davvero incasinare con docker comporre. Per controllare che cosa viene iniettato si può usare
docker compose config
Per mostrarti com'e' il file con questi iniettati.
Un problema con Fluent Email è che devi aggiungere questo al tuo csproj
  <PropertyGroup>
    <PreserveCompilationContext>true</PreserveCompilationContext>
  </PropertyGroup>
Questo perché FluentEmail utilizza RazorLight che ha bisogno di questo per funzionare.
Per i file template, puoi includerli nel tuo progetto come file Contenuto o come faccio nel contenitore docker, copiare i file nell'immagine finale
FROM build AS publish
RUN dotnet publish "Mostlylucid.csproj" -c $BUILD_CONFIGURATION -o /app/publish /p:UseAppHost=false

FROM base AS final
WORKDIR /app

COPY --from=publish /app/publish .
# Copy the Markdown directory
COPY ./Mostlylucid/Markdown /app/Markdown
COPY ./Mostlylucid/Email/Templates /app/Email/Templates
# Switch to a non-root user
USER $APP_UID
Ok, torniamo al codice!
Ora abbiamo tutto impostato possiamo aggiungere il Servizio Email. Questo è un servizio semplice che prende un modello e invia una e-mail:
public class EmailService(SmtpSettings smtpSettings, IFluentEmail fluentEmail)
{
    public async Task SendCommentEmail(string commenterEmail, string commenterName, string comment, string postSlug)
    {
        var commentModel = new CommentEmailModel
        {
            PostSlug = postSlug,
            SenderEmail = commenterEmail,
            SenderName = commenterName,
            Comment = comment
        };
        await SendCommentEmail(commentModel);
    }

    public async Task SendCommentEmail(CommentEmailModel commentModel)
    {
        // Load the template
        var templatePath = "Email/Templates/MailTemplate.template";
        await SendMail(commentModel, templatePath);
    }

    public async Task SendContactEmail(ContactEmailModel contactModel)
    {
        var templatePath = "Email/Templates/ContactEmailModel.template";

        await SendMail(contactModel, templatePath);
    }


    public async Task SendMail(BaseEmailModel model, string templatePath)
    {
        var template = await File.ReadAllTextAsync(templatePath);
        // Use FluentEmail to send the email
        var email = fluentEmail.UsingTemplate(template, model);
        await email.To(smtpSettings.ToMail)
            .SetFrom(smtpSettings.SenderEmail, smtpSettings.SenderName)
            .Subject("New Comment")
            .SendAsync();
    }
}
Come potete vedere qui abbiamo due metodi, uno per i commenti e uno per il modulo di contatto (Mandami una posta! ). In questa applicazione ti faccio accedere in modo da poter ottenere la posta da (e per evitare lo spam).
Davvero la maggior parte del lavoro è fatto qui:
 var template = await File.ReadAllTextAsync(templatePath);
        // Use FluentEmail to send the email
        var email = fluentEmail.UsingTemplate(template, model);
        await email.To(smtpSettings.ToMail)
            .SetFrom(smtpSettings.SenderEmail, smtpSettings.SenderName)
            .Subject("New Comment")
            .SendAsync();
Qui si apre un file modello, si aggiunge il modello contenente il contenuto per l'email, lo si carica in FluentEmail e poi lo si invia. Il modello è un semplice file Razor:
@model Mostlylucid.Email.Models.ContactEmailModel

<!DOCTYPE html>
<html class="dark">
<head>
    <title>Comment Email</title>
</head>
<body>
<h1>Comment Email</h1>
<p>New comment from email @Model.SenderEmail name @Model.SenderName</p>

<p>Thank you for your comment on our blog post. We appreciate your feedback.</p>
<p>Here is your comment:</p>
<div>
    @Raw( @Model.Comment)</div>
<p>Thanks,</p>
<p>The Blog Team</p>

</body>
</html>
Questi sono memorizzati come file.template nella cartella Email/Templates. È possibile utilizzare i file.cshtml, ma causa un problema con il tag @Raw nel modello (è una cosa rasoio).
Finalmente arriviamo al controller; è davvero abbastanza semplice
    [HttpPost]
    [Route("submit")]
    [Authorize]
    public async Task<IActionResult> Submit(string comment)
    {
        var user = GetUserInfo();
            var commentHtml = commentService.ProcessComment(comment);
            var contactModel = new ContactEmailModel()
            {
                SenderEmail = user.email,
                SenderName =user.name,
                Comment = commentHtml,
            };
            await emailService.SendContactEmail(contactModel);
            return PartialView("_Response", new ContactViewModel(){Email = user.email, Name = user.name, Comment = commentHtml, Authenticated = user.loggedIn});

        return RedirectToAction("Index", "Home");
    }
Qui otteniamo le informazioni utente, elaborare il commento (io uso un semplice processore markdown con Markdig per convertire markdown in HTML) e quindi inviare l'email.