NOTE: Apart from

You can see how this translation was done in this article.
Friday, 13 September 2024
//6 minute read
यह एक बहुत ही सरल लेख है लेकिन उपयोग करने की कुछ कमज़ोरी को कवर करेगा फ्लाइडल ई- मेल एक UNEAN.NT कोर कोर को भेजने के लिए...... मैं कहीं और नहीं देखा है.
HTML डाक भेजना स्वयं ही Smpipient के साथ एक सरल सरल है, लेकिन यह बहुत ढीली नहीं है और टेम्पलेट या संलग्नक जैसे चीजों को समर्थन नहीं करता है. फ्लू ईगल इस के लिए एक महान पुस्तकालय है, लेकिन यह हमेशा स्पष्ट नहीं है कि कैसे ACAN में इसका उपयोग करें. NEENT कोर.
Razory (यह उस में बनाया गया है) फ्लॉण्ड को आप अपने ई- मेल का टैम्प्लेट बनाने देता है Rachore सिंटेक्स का उपयोग करके. यह महान है क्योंकि यह आपको अपने ई- मेल बनाने की पूरी शक्ति का उपयोग करने की अनुमति देता है.
सबसे पहले, आपको फ्लू ई- मेल को संस्थापित करने की आवश्यकता है.
dotnet add package FluentEmail.Core
dotnet add package FluentEmail.Smtp
dotnet add package FluentEmail.Razor
चीजों को अलग रखने के लिए फिर मैंने ई- मेल- सेवा केंद्र बनाया जो अनक्शन सेवाएँ नियत करता है:
namespace Mostlylucid.Email;

public static class Setup
{
    public static void SetupEmail(this IServiceCollection services, IConfiguration config)
    {
          var smtpSettings = services.ConfigurePOCO<SmtpSettings>(config.GetSection(SmtpSettings.Section));

        services.AddFluentEmail(smtpSettings.SenderEmail, smtpSettings.SenderName)
            .AddRazorRenderer();

        services.AddSingleton<ISender>(new SmtpSender( () => new SmtpClient()
        {
            DeliveryMethod = SmtpDeliveryMethod.Network,
            Host = smtpSettings.Server,
            Port = smtpSettings.Port,
            Credentials = new NetworkCredential(smtpSettings.Username, smtpSettings.Password),
            EnableSsl = smtpSettings.EnableSSL,
            UseDefaultCredentials = false
        }));
        services.AddSingleton<EmailService>();

    }

}
जैसा कि आप देखेंगे...... मैं भी मेरे में उल्लेख ICafftiging विधि का उपयोग किया जाएगा पिछला आलेख एसएमटीपी विन्यास प्राप्त करने के लिए.
var smtpSettings = services.ConfigurePOCO<SmtpSettings>(config.GetSection(SmtpSettings.Section));
यह ए- से- ऑक्कर्सन फ़ाइल से आता है:
"SmtpSettings":
  {
    "Server": "smtp.gmail.com",
    "Port": 587,
    "SenderName": "Mostlylucid",
    "Username": "",
    "SenderEmail": "[email protected]",
    "Password": "",
    "EnableSSL": "true",
    "EmailSendTry": 3,
    "EmailSendFailed": "true",
    "ToMail": "[email protected]",
    "EmailSubject": "Mostlylucid"

  }
नोट: अगर आप एमएफए का उपयोग करते हैं (जिसे आप चाहते हैं) *वास्तव में आप एक बनाने की आवश्यकता होगी आपके खाते के लिए कूटशब्द दाखिल करें.
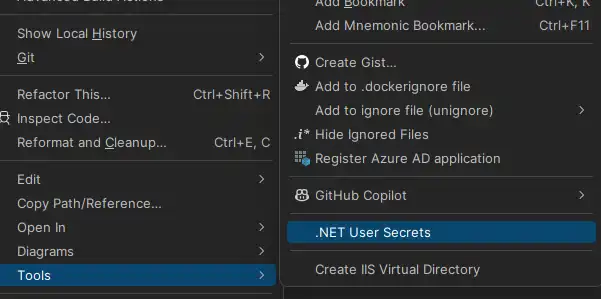
स्थानीय डेव्स के लिए, आप इसे अपने रहस्य में जोड़ सकते हैं.jon फ़ाइल:

बंद करने के लिए जिसे आप सामान्य रूप से उपयोग करते हैं इसे किसी.env फ़ाइल में शामिल करें:
SMTPSETTINGS_USERNAME="[email protected]"
SMTPSETTINGS_PASSWORD="<MFA PASSWORD>" -- this is the app password you created
तब डॉकर रचना में फ़ाइल आप इन्हें एनवी वेरिएबल के रूप में बाहर करें:
services:
  mostlylucid:
    image: scottgal/mostlylucid:latest
    ports:
      - 8080:8080
    environment:
      - SmtpSettings__UserName=${SMTPSETTINGS_USERNAME}
      - SmtpSettings__Password=${SMTPSETTINGS_PASSWORD}
जगह के बारे में एक नोट लें...... यह सच में आप कोर रचना के साथ गड़बड़ कर सकते हैं. जाँच के लिए आप क्या इस्तेमाल कर सकते हैं
docker compose config
आपको दिखाने के लिए कि फाइल क्या दिखता है इन places के साथ की तरह लग रहा है.
फ्लैक ईमेल के साथ एक अंक है आप इस को अपने csproz में जोड़ने की जरूरत है
  <PropertyGroup>
    <PreserveCompilationContext>true</PreserveCompilationContext>
  </PropertyGroup>
इसका मतलब यह है कि एफ. आई. वी.
टेम्पलेट फ़ाइलों के लिए, आप या तो उन्हें अपनी परियोजना में सामग्री फ़ाइलों के रूप में शामिल कर सकते हैं या जैसे कि मैं डाकर कंटेनर में करता हूँ, अंतिम छवि में फ़ाइलों की नक़ल कर सकते हैं
FROM build AS publish
RUN dotnet publish "Mostlylucid.csproj" -c $BUILD_CONFIGURATION -o /app/publish /p:UseAppHost=false

FROM base AS final
WORKDIR /app

COPY --from=publish /app/publish .
# Copy the Markdown directory
COPY ./Mostlylucid/Markdown /app/Markdown
COPY ./Mostlylucid/Email/Templates /app/Email/Templates
# Switch to a non-root user
USER $APP_UID
कोड पर वापस!
अब हम यह सब तय किया है हम ई- मेल सेवा जोड़ सकते हैं. यह एक सरल सेवा है जो टेम्पलेट ले जाता है और एक ईमेल भेजता है:
public class EmailService(SmtpSettings smtpSettings, IFluentEmail fluentEmail)
{
    public async Task SendCommentEmail(string commenterEmail, string commenterName, string comment, string postSlug)
    {
        var commentModel = new CommentEmailModel
        {
            PostSlug = postSlug,
            SenderEmail = commenterEmail,
            SenderName = commenterName,
            Comment = comment
        };
        await SendCommentEmail(commentModel);
    }

    public async Task SendCommentEmail(CommentEmailModel commentModel)
    {
        // Load the template
        var templatePath = "Email/Templates/MailTemplate.template";
        await SendMail(commentModel, templatePath);
    }

    public async Task SendContactEmail(ContactEmailModel contactModel)
    {
        var templatePath = "Email/Templates/ContactEmailModel.template";

        await SendMail(contactModel, templatePath);
    }


    public async Task SendMail(BaseEmailModel model, string templatePath)
    {
        var template = await File.ReadAllTextAsync(templatePath);
        // Use FluentEmail to send the email
        var email = fluentEmail.UsingTemplate(template, model);
        await email.To(smtpSettings.ToMail)
            .SetFrom(smtpSettings.SenderEmail, smtpSettings.SenderName)
            .Subject("New Comment")
            .SendAsync();
    }
}
जैसा कि आप यहाँ देख सकते हैं हम दो तरीके हैं, एक टिप्पणी के लिए और संपर्क के रूप में के लिए एक ()मुझे एक डाक भेजें! ___ इस app में मैं आपको लॉगिन करता हूँ ताकि मैं यह पत्र मिल सकूँ (और स्पैम से दूर).
वास्तव में यहाँ काम किया जाता है:
 var template = await File.ReadAllTextAsync(templatePath);
        // Use FluentEmail to send the email
        var email = fluentEmail.UsingTemplate(template, model);
        await email.To(smtpSettings.ToMail)
            .SetFrom(smtpSettings.SenderEmail, smtpSettings.SenderName)
            .Subject("New Comment")
            .SendAsync();
यहाँ हम एक टैम्प्लेट फ़ाइल खोलें, जो ईमेल के लिए सामग्री वाली मॉडल को जोड़ता है, इसे हवादार ईमेल में लोड करके फिर भेजें. टैम्प्लेट एक सादा राजेर फ़ाइल है:
@model Mostlylucid.Email.Models.ContactEmailModel

<!DOCTYPE html>
<html class="dark">
<head>
    <title>Comment Email</title>
</head>
<body>
<h1>Comment Email</h1>
<p>New comment from email @Model.SenderEmail name @Model.SenderName</p>

<p>Thank you for your comment on our blog post. We appreciate your feedback.</p>
<p>Here is your comment:</p>
<div>
    @Raw( @Model.Comment)</div>
<p>Thanks,</p>
<p>The Blog Team</p>

</body>
</html>
ये ई- टैम्प्लेट फ़ोल्डर में सहेजने के लिए रखे गए हैं. @ info/ plain आप उपयोग कर सकते हैं
अंत में हम नियंत्रण करने के लिए मिलता है; यह वास्तव में बहुत सीधा है
    [HttpPost]
    [Route("submit")]
    [Authorize]
    public async Task<IActionResult> Submit(string comment)
    {
        var user = GetUserInfo();
            var commentHtml = commentService.ProcessComment(comment);
            var contactModel = new ContactEmailModel()
            {
                SenderEmail = user.email,
                SenderName =user.name,
                Comment = commentHtml,
            };
            await emailService.SendContactEmail(contactModel);
            return PartialView("_Response", new ContactViewModel(){Email = user.email, Name = user.name, Comment = commentHtml, Authenticated = user.loggedIn});

        return RedirectToAction("Index", "Home");
    }
यहाँ हम उपयोक्ता जानकारी प्राप्त करते हैं, प्रक्रिया (मैं एक सरल निशान प्रक्रिया का उपयोग करता हूँ जो मार्क्डर के साथ एचटीएमएल में निशान नीचे परिवर्तित करने के लिए करें) और फिर ईमेल भेजें.