NOTE: Apart from

You can see how this translation was done in this article.
Wednesday, 21 August 2024
//5 minute read
En el último artículo Te mostré cómo configurar una búsqueda de texto completo usando las capacidades de búsqueda de texto completo de Postgres. Mientras desenmascaraba una búsqueda no tenía una forma de usarla, así que... era un poco provocador. En este artículo te mostraré cómo usar el api de búsqueda para buscar texto en tu base de datos.
Las partes anteriores de esta serie:
Las siguientes partes de esta serie:
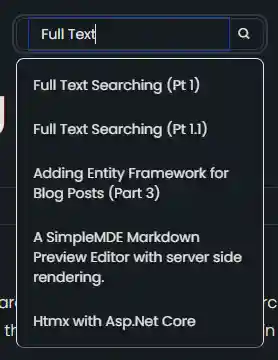
Esto añadirá un pequeño cuadro de búsqueda a la cabecera del sitio que permitirá a los usuarios buscar texto en las publicaciones del blog.

Nota: El elefante en la habitación es que no considero la mejor manera de hacer esto. Para soportar el multi-lenguaje es super complejo (necesitaría una columna diferente por idioma) y tendría que manejar las cosas específicas de la lengua y otros. Voy a ignorar esto por ahora y centrarme en el inglés. Más tarde mostraremos cómo manejar esto en OpenSearch.
Para añadir una capacidad de búsqueda tuve que hacer algunos cambios en la búsqueda api. He añadido manejo para frases usando el EF.Functions.WebSearchToTsQuery("english", processedQuery)
    private async Task<List<(string Title, string Slug)>> GetSearchResultForQuery(string query)
    {
        var processedQuery = query;
        var posts = await context.BlogPosts
            .Include(x => x.Categories)
            .Include(x => x.LanguageEntity)
            .Where(x =>
                // Search using the precomputed SearchVector
                (x.SearchVector.Matches(EF.Functions.WebSearchToTsQuery("english", processedQuery)) // Use precomputed SearchVector for title and content
                || x.Categories.Any(c =>
                    EF.Functions.ToTsVector("english", c.Name)
                        .Matches(EF.Functions.WebSearchToTsQuery("english", processedQuery)))) // Search in categories
                && x.LanguageEntity.Name == "en")// Filter by language

            .OrderByDescending(x =>
                // Rank based on the precomputed SearchVector
                x.SearchVector.Rank(EF.Functions.WebSearchToTsQuery("english", processedQuery))) // Use precomputed SearchVector for ranking
            .Select(x => new { x.Title, x.Slug,  })
            .Take(5)
            .ToListAsync();
        return posts.Select(x=> (x.Title, x.Slug)).ToList();
    }
Esto se utiliza opcionalmente cuando hay un espacio en la consulta
    if (!query.Contains(" "))
        {
            posts = await GetSearchResultForComplete(query);
        }
        else
        {
            posts = await GetSearchResultForQuery(query);
        }
De lo contrario, utilizo el método de búsqueda existente que añade el carácter prefijo.
EF.Functions.ToTsQuery("english", query + ":*")
Uso Alpine.js Hice un simple control parcial que proporciona una caja de búsqueda súper simple.
<div x-data="window.mostlylucid.typeahead()" class="relative"    x-on:click.outside="results = []">

    <label class="input input-sm dark:bg-custom-dark-bg bg-white input-bordered flex items-center gap-2">


        <input
            type="text"
            x-model="query"

            x-on:input.debounce.300ms="search"
            x-on:keydown.down.prevent="moveDown"
            x-on:keydown.up.prevent="moveUp"
            x-on:keydown.enter.prevent="selectHighlighted"
            placeholder="Search..."
            class="border-0 grow  input-sm text-black dark:text-white bg-transparent w-full"/>
        <i class="bx bx-search"></i>
    </label>
    <!-- Dropdown -->
    <ul x-show="results.length > 0"
        class="absolute z-10 my-2 w-full bg-white dark:bg-custom-dark-bg border border-1 text-black dark:text-white border-b-neutral-600 dark:border-gray-300   rounded-lg shadow-lg">
        <template x-for="(result, index) in results" :key="result.slug">
            <li
                x-on:click="selectResult(result)"
                :class="{
                    'dark:bg-blue-dark bg-blue-light': index === highlightedIndex,
                    'dark:hover:bg-blue-dark hover:bg-blue-light': true
                }"
                class="cursor-pointer text-sm p-2 m-2"
                x-text="result.title"
            ></li>
        </template>
    </ul>
</div>
Esto tiene un montón de clases CSS para renderizar correctamente para el modo oscuro o claro. El código Alpine.js es bastante simple. Es un simple control de tipoahead que llama a la búsqueda api cuando el usuario escribe en el cuadro de búsqueda. También tenemos un pequeño código para manejar el desenfoque para cerrar los resultados de búsqueda.
x-on:click.outside="results = []"
Tenga en cuenta que tenemos un debounce aquí para evitar martillar el servidor con peticiones.
Esto llama a nuestra función JS (definida en src/js/main.js)
window.mostlylucid = window.mostlylucid || {};

window.mostlylucid.typeahead = function () {
    return {
        query: '',
        results: [],
        highlightedIndex: -1, // Tracks the currently highlighted index

        search() {
            if (this.query.length < 2) {
                this.results = [];
                this.highlightedIndex = -1;
                return;
            }

            fetch(`/api/search/${encodeURIComponent(this.query)}`)
                .then(response => response.json())
                .then(data => {
                    this.results = data;
                    this.highlightedIndex = -1; // Reset index on new search
                });
        },

        moveDown() {
            if (this.highlightedIndex < this.results.length - 1) {
                this.highlightedIndex++;
            }
        },

        moveUp() {
            if (this.highlightedIndex > 0) {
                this.highlightedIndex--;
            }
        },

        selectHighlighted() {
            if (this.highlightedIndex >= 0 && this.highlightedIndex < this.results.length) {
                this.selectResult(this.results[this.highlightedIndex]);
            }
        },

        selectResult(result) {
           window.location.href = result.url;
            this.results = []; // Clear the results
            this.highlightedIndex = -1; // Reset the highlighted index
        }
    }
}
Como se puede ver esto es bastante simple (gran parte de la complejidad es manejar las teclas arriba y abajo para seleccionar los resultados).
Este post a nuestro SearchApi
Cuando se selecciona un resultado, navegamos a la url del resultado.
     search() {
            if (this.query.length < 2) {
                this.results = [];
                this.highlightedIndex = -1;
                return;
            }

            fetch(`/api/search/${encodeURIComponent(this.query)}`)
                .then(response => response.json())
                .then(data => {
                    this.results = data;
                    this.highlightedIndex = -1; // Reset index on new search
                });
        },
También cambié la búsqueda para trabajar con HTMX, esto simplemente cambia la search método para utilizar una actualización de HTMX:
    selectResult(result) {
    htmx.ajax('get', result.url, {
        target: '#contentcontainer',  // The container to update
        swap: 'innerHTML', // Replace the content inside the target
    }).then(function() {
        history.pushState(null, '', result.url); // Push the new url to the history
    });

    this.results = []; // Clear the results
    this.highlightedIndex = -1; // Reset the highlighted index
    this.query = ''; // Clear the query
}
Tenga en cuenta que intercambiamos el innerHTML de la contentcontainer con el resultado de la búsqueda. Esta es una manera sencilla de actualizar el contenido de la página con el resultado de la búsqueda sin una actualización de la página.
También cambiamos la url en la historia a la nueva url.
Esto añade una capacidad de búsqueda potente pero simple al sitio. Es una gran manera de ayudar a los usuarios a encontrar lo que están buscando. Le da a este sitio una sensación más profesional y hace que sea más fácil de navegar.