This is a viewer only at the moment see the article on how this works.
To update the preview hit Ctrl-Alt-R (or ⌘-Alt-R on Mac) or Enter to refresh. The Save icon lets you save the markdown file to disk
This is a preview from the server running through my markdig pipeline
在 最后一条 我教过你如何使用 Postgres 的全文本搜索能力 设置完整的文本搜索 虽然我揭发了一个搜索提示......我没有办法真正使用它......所以... 在本篇文章中,我将教你如何使用搜索信头在数据库中搜索文本。
本序列的先前部分 :
本系列的下一部分:
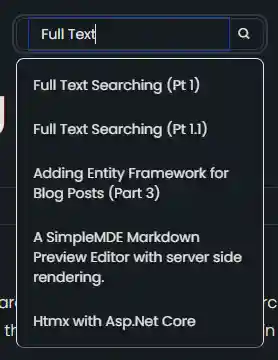
这将在网站页眉上添加一个小搜索框, 让用户可以搜索博客文章中的文字。

注意: 房间里的大象是我不认为这样做的最佳方式。 支持多语种非常复杂(我需要不同语言的专栏), 我暂时不理会这个,只关注英语。 过会儿我们会在OpenSearch展示如何处理这件事
[技选委
为了增加搜索能力,我不得不对搜索程序做一些修改。 我添加了使用 EF.Functions.WebSearchToTsQuery("english", processedQuery)
    private async Task<List<(string Title, string Slug)>> GetSearchResultForQuery(string query)
    {
        var processedQuery = query;
        var posts = await context.BlogPosts
            .Include(x => x.Categories)
            .Include(x => x.LanguageEntity)
            .Where(x =>
                // Search using the precomputed SearchVector
                (x.SearchVector.Matches(EF.Functions.WebSearchToTsQuery("english", processedQuery)) // Use precomputed SearchVector for title and content
                || x.Categories.Any(c =>
                    EF.Functions.ToTsVector("english", c.Name)
                        .Matches(EF.Functions.WebSearchToTsQuery("english", processedQuery)))) // Search in categories
                && x.LanguageEntity.Name == "en")// Filter by language

            .OrderByDescending(x =>
                // Rank based on the precomputed SearchVector
                x.SearchVector.Rank(EF.Functions.WebSearchToTsQuery("english", processedQuery))) // Use precomputed SearchVector for ranking
            .Select(x => new { x.Title, x.Slug,  })
            .Take(5)
            .ToListAsync();
        return posts.Select(x=> (x.Title, x.Slug)).ToList();
    }
当查询中有空格时, 此选项可选择使用
    if (!query.Contains(" "))
        {
            posts = await GetSearchResultForComplete(query);
        }
        else
        {
            posts = await GetSearchResultForQuery(query);
        }
否则,我使用现有的搜索方法来附加前缀字符。
EF.Functions.ToTsQuery("english", query + ":*")
使用 阿尔卑山 我做了一个简单的部分控制 提供了一个超级简单的搜索箱
<div x-data="window.mostlylucid.typeahead()" class="relative"    x-on:click.outside="results = []">

    <label class="input input-sm dark:bg-custom-dark-bg bg-white input-bordered flex items-center gap-2">


        <input
            type="text"
            x-model="query"

            x-on:input.debounce.300ms="search"
            x-on:keydown.down.prevent="moveDown"
            x-on:keydown.up.prevent="moveUp"
            x-on:keydown.enter.prevent="selectHighlighted"
            placeholder="Search..."
            class="border-0 grow  input-sm text-black dark:text-white bg-transparent w-full"/>
        <i class="bx bx-search"></i>
    </label>
    <!-- Dropdown -->
    <ul x-show="results.length > 0"
        class="absolute z-10 my-2 w-full bg-white dark:bg-custom-dark-bg border border-1 text-black dark:text-white border-b-neutral-600 dark:border-gray-300   rounded-lg shadow-lg">
        <template x-for="(result, index) in results" :key="result.slug">
            <li
                x-on:click="selectResult(result)"
                :class="{
                    'dark:bg-blue-dark bg-blue-light': index === highlightedIndex,
                    'dark:hover:bg-blue-dark hover:bg-blue-light': true
                }"
                class="cursor-pointer text-sm p-2 m-2"
                x-text="result.title"
            ></li>
        </template>
    </ul>
</div>
这有一堆 CSS 类可以校正 用于暗模式或光模式 。 阿尔卑斯山的密码很简单 当用户在搜索框中输入类型时, 它是一个简单的类型头控件, 它会调用搜索 spi 。 我们还有一个小的代码 处理无焦点 关闭搜索结果。
x-on:click.outside="results = []"
注意,我们这里有一个跳跃 以避免敲敲服务器 与请求。
这要求我们发挥联合联合办事处的职能(定义如下: src/js/main.js)
window.mostlylucid = window.mostlylucid || {};

window.mostlylucid.typeahead = function () {
    return {
        query: '',
        results: [],
        highlightedIndex: -1, // Tracks the currently highlighted index

        search() {
            if (this.query.length < 2) {
                this.results = [];
                this.highlightedIndex = -1;
                return;
            }

            fetch(`/api/search/${encodeURIComponent(this.query)}`)
                .then(response => response.json())
                .then(data => {
                    this.results = data;
                    this.highlightedIndex = -1; // Reset index on new search
                });
        },

        moveDown() {
            if (this.highlightedIndex < this.results.length - 1) {
                this.highlightedIndex++;
            }
        },

        moveUp() {
            if (this.highlightedIndex > 0) {
                this.highlightedIndex--;
            }
        },

        selectHighlighted() {
            if (this.highlightedIndex >= 0 && this.highlightedIndex < this.results.length) {
                this.selectResult(this.results[this.highlightedIndex]);
            }
        },

        selectResult(result) {
           window.location.href = result.url;
            this.results = []; // Clear the results
            this.highlightedIndex = -1; // Reset the highlighted index
        }
    }
}
正如你可以看到的,这很简单(许多复杂因素是处理选择结果的上下键)。
担任此职位, SearchApi
当选中结果时, 我们将导航到结果的 URL 。
     search() {
            if (this.query.length < 2) {
                this.results = [];
                this.highlightedIndex = -1;
                return;
            }

            fetch(`/api/search/${encodeURIComponent(this.query)}`)
                .then(response => response.json())
                .then(data => {
                    this.results = data;
                    this.highlightedIndex = -1; // Reset index on new search
                });
        },
我还改了HTMX的接头工作,这简单改变了HTMX的 search 使用 HTMX 刷新的方法 :
    selectResult(result) {
    htmx.ajax('get', result.url, {
        target: '#contentcontainer',  // The container to update
        swap: 'innerHTML', // Replace the content inside the target
    }).then(function() {
        history.pushState(null, '', result.url); // Push the new url to the history
    });

    this.results = []; // Clear the results
    this.highlightedIndex = -1; // Reset the highlighted index
    this.query = ''; // Clear the query
}
请注意,我们交换 内HTML contentcontainer 与搜索的结果。 这是以搜索结果更新页面内容的简单方式, 无需更新页面 。
我们还将历史的内脏改成新的内脏。
这为该场址增加了强大而简单的搜索能力。 这是帮助用户找到他们要找的东西的好方法 它让这个网站更专业,更便于浏览。