This is a viewer only at the moment see the article on how this works.
To update the preview hit Ctrl-Alt-R (or ⌘-Alt-R on Mac) or Enter to refresh. The Save icon lets you save the markdown file to disk
This is a preview from the server running through my markdig pipeline
In questa applicazione ho voluto aggiungere un meccanismo simple di consentire il login per aggiungere commenti (e alcune attività di amministrazione) all'applicazione. Ho voluto utilizzare Google Auth per questo scopo. Non ho voluto utilizzare il database ASP.NET Identità per questo scopo. Ho voluto mantenere l'applicazione il più semplice possibile per il più a lungo possibile.
I database sono un potente componente di qualsiasi applicazione, ma aggiungono anche complessità. Volevo evitare questa complessità fino a quando non ne avevo davvero bisogno.
In primo luogo è necessario impostare Google Auth nella console di sviluppo di Google. È possibile seguire i passaggi in questocollegamentoper ottenere i tuoi dati impostati per voi Google Client ID e Segreto.
Una volta che hai il tuo Google Client ID e Segreto, è possibile aggiungerli al tuo appsettings.json file.
    "Auth" :{
"GoogleClientId": "",
"GoogleClientSecret": ""
}
COME NON dovete controllarli nel controllo sorgente. Invece per lo sviluppo locale potete usare il file Secrets:
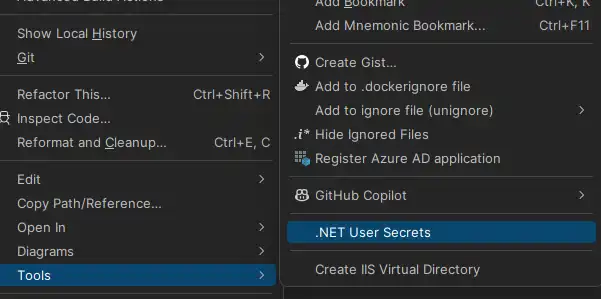
Lì puoi aggiungere il tuo Google Client ID e Secret (nota che il tuo cliente Id non è in realtà confidenziale, come vedrai più tardi è incluso nella chiamata JS sul front end.
    "Auth" :{
  "GoogleClientId": "ID",
  "GoogleClientSecret": "CLIENTSECRET"
}
Si noti che uso una versione modificata dell'IConfigSection di Steve Smith (recentemente resa famosa da Phil Haack). Questo è per evitare la roba IOptions che trovo un po 'clutky (e raramente bisogno come quasi mai cambiare configurazione dopo l'implementazione nei miei scenari).
Nel mio faccio questo che mi permette di ottenere il nome della sezione dalla classe stessa:
namespace Mostlylucid.Config;

public static class ConfigExtensions {
    public static TConfig ConfigurePOCO<TConfig>(this IServiceCollection services, IConfiguration configuration)
        where TConfig : class, new() {
        if (services == null) throw new ArgumentNullException(nameof(services));
        if (configuration == null) throw new ArgumentNullException(nameof(configuration));

        var config = new TConfig();
        configuration.Bind(config);
        services.AddSingleton(config);
        return config;
    }

    public static TConfig Configure<TConfig>(this WebApplicationBuilder builder)
        where TConfig : class, IConfigSection, new() {
        var services = builder.Services;
        var configuration = builder.Configuration;
        var sectionName = TConfig.Section;
        return services.ConfigurePOCO<TConfig>(configuration.GetSection(sectionName));
    }


    public static TConfig GetConfig<TConfig>(this WebApplicationBuilder builder)
        where TConfig : class, IConfigSection, new() {
        var configuration = builder.Configuration;
        var sectionName = TConfig.Section;
        var section = configuration.GetSection(sectionName).Get<TConfig>();
        return section;

    }

    public static Dictionary<string, object> GetConfigSection(this IConfiguration configuration, string sectionName) {
        var section = configuration.GetSection(sectionName);
        var result = new Dictionary<string, object>();
        foreach (var child in section.GetChildren()) {
            var key = child.Key;
            var value = child.Value;
            result.Add(key, value);
        }

        return result;
    }

    public static Dictionary<string, object> GetConfigSection<TConfig>(this WebApplicationBuilder builder)
        where TConfig : class, IConfigSection, new() {
        var configuration = builder.Configuration;
        var sectionName = TConfig.Section;
        return configuration.GetConfigSection(sectionName);
    }
}

public interface IConfigSection {
    public static abstract string Section { get; }
}
public class Auth : IConfigSection
{
    public static string Section => "Auth";
    public string GoogleClientId { get; set; }
    public string GoogleClientSecret { get; set; }

    public string AdminUserGoogleId { get; set; }

}
Dove uso un metodo di interfaccia statica per ottenere il nome della sezione.
Poi nella mia startup posso fare questo:
var auth = builder.GetConfig<Auth>();
Comunque torniamo alla roba di Google!
Per aggiungere effettivamente questo
services.AddCors(options =>
{
    options.AddPolicy("AllowMostlylucid",
        builder =>
        {
            builder.WithOrigins("https://www.mostlylucid.net")
                .WithOrigins("https://mostlylucid.net")
                .WithOrigins("https://localhost:7240")
                .AllowAnyHeader()
                .AllowAnyMethod();
        });
});

builder.Services
    .AddAuthentication(options =>
    {
        options.DefaultScheme = CookieAuthenticationDefaults.AuthenticationScheme;
        options.DefaultChallengeScheme = GoogleDefaults.AuthenticationScheme;


    })
    .AddCookie()
    .AddGoogle(options =>
    {
        options.ClientId = auth.GoogleClientId;
        options.ClientSecret = auth.GoogleClientSecret;
    });
Noterete che ci sono voci CORS qui, è anche necessario impostare questi nella console di identità Google.
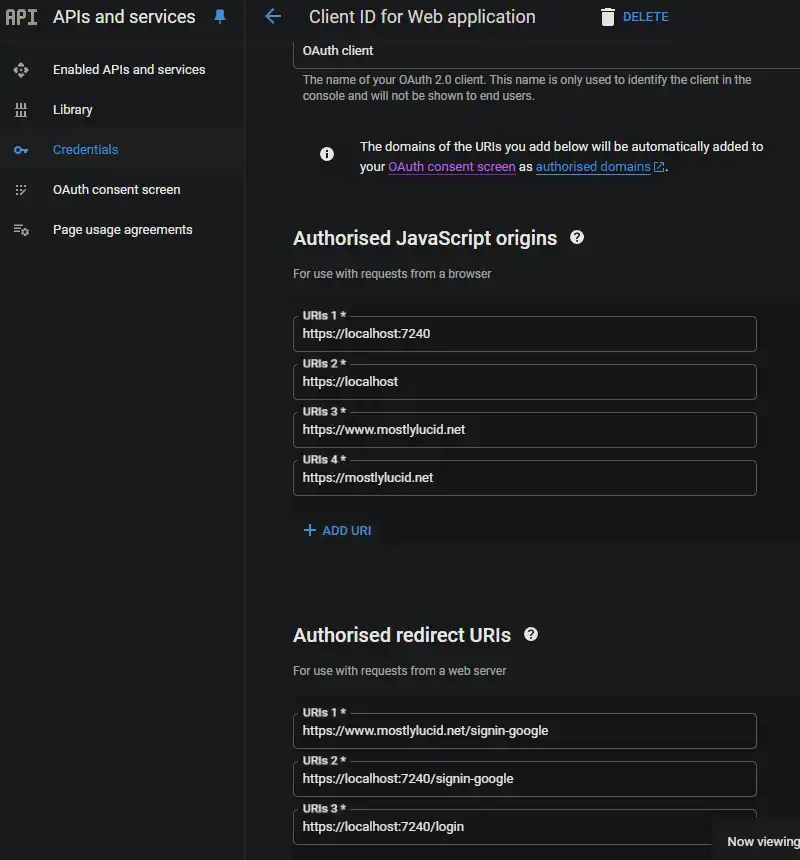
Questo assicura che il Google Auth possa essere utilizzato solo dai domini specificati.
Nella mia_Layout.cshtml Ho questo Javascript, qui è dove ho impostato i miei pulsanti di Google e attivare un callback che registra l'app ASP.NET.
<script src="https://accounts.google.com/gsi/client" async defer></script>
Questo è il dlow per il codice qui sotto
        function renderButton(element)
        {
            google.accounts.id.renderButton(
                element,
                {
                    type: "standard",
                    size: "large",
                    width: 200,
                    theme: "filled_black",
                    text: "sign_in_with",
                    shape: "rectangular",
                    logo_alignment: "left"
                }
            );
        }
        function initGoogleSignIn() {
            google.accounts.id.initialize({
                client_id: "839055275161-u7dqn2oco2729n6i5mk0fe7gap0bmg6g.apps.googleusercontent.com",
                callback: handleCredentialResponse
            });
            const element = document.getElementById('google_button');
            if (element) {
                renderButton(element);
            }
            const secondElement = document.getElementById('google_button2');
            if (secondElement) {
                renderButton(secondElement);
            }

        }

        function handleCredentialResponse(response) {
            if (response.credential) {
                const xhr = new XMLHttpRequest();
                xhr.open('POST', '/login', true);
                xhr.setRequestHeader('Content-Type', 'application/json');
                xhr.onload = function () {
                    if (xhr.status === 200) {
                        window.location.reload();
                    } else {
                        console.error('Failed to log in.');
                    }
                };
                xhr.send(JSON.stringify({ idToken: response.credential }));
            } else {
                console.error('No credential in response.');
            }
        }

        window.onload = initGoogleSignIn;
Qui potete vedere che ho fino a due elementi div nella pagina con il tasto id google_button e il tasto google_button2. Questi sono gli elementi in cui il Google JS renderà i pulsanti.
SUGGERIMENTO: Se si utilizza Tailwind, è possibile ridurre il pulsante div per funzionare correttamente in modalità scura (altrimenti rende uno sfondo bianco intorno al pulsante)
<div class="w-[200px] h-[39px] overflow-hidden rounded">
    <div id="google_button">
    </div>
</div>
Nel JavaScript sopra ho postato questo di nuovo a un'azione Controller chiamato Login. Qui è dove gestisco il Google Auth.
      const xhr = new XMLHttpRequest();
                xhr.open('POST', '/login', true);
                xhr.setRequestHeader('Content-Type', 'application/json');
                xhr.onload = function () {
                    if (xhr.status === 200) {
                        window.location.reload();
                    } else {
                        console.error('Failed to log in.');
                    }
                };
                xhr.send(JSON.stringify({ idToken: response.credential }));
Il Controller è qui' è abbastanza semplice prende il JWT pubblicato, lo decodifica poi lo usa per accedere all'app.
    [Route("login")]
        [HttpPost]
        public async Task<IActionResult> HandleGoogleCallback([FromBody] GoogleLoginRequest request)
        {
            var handler = new JwtSecurityTokenHandler();
            var jsonToken = handler.ReadToken(request.IdToken) as JwtSecurityToken;

            if (jsonToken == null)
            {
                return BadRequest("Invalid token");
            }

            var claimsIdentity = new ClaimsIdentity(
                jsonToken.Claims,
                GoogleDefaults.AuthenticationScheme);

            var authProperties = new AuthenticationProperties
            {
                IsPersistent = true
            };

            await HttpContext.SignInAsync(
                CookieAuthenticationDefaults.AuthenticationScheme,
                new ClaimsPrincipal(claimsIdentity),
                authProperties);

            return Ok();
        }
    }
NOTA: Questo non è prefetto in quanto esses up i nomi di reclamo (sono tutti minuscoli) ma funziona per ora.
Nel mio BaseController estraggo le proprietà di cui ho bisogno;
      public record LoginData(bool loggedIn, string? name, string? avatarUrl, string? identifier);

    protected LoginData GetUserInfo()
    {
        var authenticateResult = HttpContext.AuthenticateAsync(CookieAuthenticationDefaults.AuthenticationScheme).Result;
        if (authenticateResult.Succeeded)
        {
            var principal = authenticateResult.Principal;
            if(principal == null)
            {
                return new LoginData(false, null, null, null);
            }
            var name = principal.FindFirst("name").Value;
            var avatarUrl =principal.FindFirst("picture").Value;
            var nameIdentifier = principal.FindFirst("sub");
            return new LoginData(true, name, avatarUrl, nameIdentifier?.Value);
        }
        return new LoginData(false,null,null,null);
    }
E questo è tutto! Questo consente di utilizzare Google Authentication senza utilizzare il database ASP.NET Identity.
