This is a viewer only at the moment see the article on how this works.
To update the preview hit Ctrl-Alt-R (or ⌘-Alt-R on Mac) or Enter to refresh. The Save icon lets you save the markdown file to disk
This is a preview from the server running through my markdig pipeline
इस से मैं ए. (और कुछ प्रशासक कार्य) को टिप्पणी करने की अनुमति देना चाहता था. मैं इस उद्देश्य के लिए गूगल आंग प्रयोग करना चाहता था. मैं इस उद्देश्य से एनईसी पहचान डाटाबेस का उपयोग नहीं करना चाहता था. मैं ए. डी. एच.
डाटाबेस किसी भी अनुप्रयोग का एक शक्तिशाली भाग हैं लेकिन वे जटिलता भी बढ़ाते हैं । मैं उस जटिलता से दूर रहना चाहता था जब तक कि मुझे वास्तव में इसकी ज़रूरत नहीं थी ।
[विषय
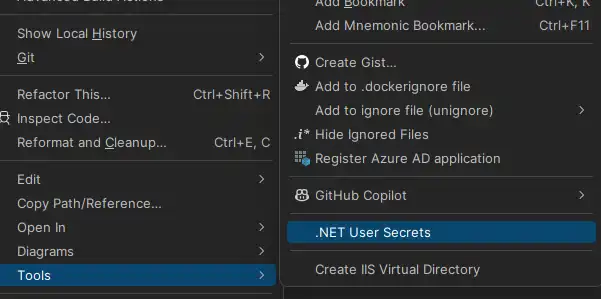
सबसे पहले आपको गूगल एसिंक को गूगल डेवलपर कंसोल में नियत करना होगा. आप इस मामले में कदम उठा सकते हैं कड़ी आपके गूगल क्लाएंट आईडी और रहस्य के लिए अपनी जानकारी स्थापित करने के लिए.
एक बार जब आप अपने गूगल क्लाएंट आईडी और रहस्य है, आप उन्हें अपने एगाइट्स फ़ाइल में जोड़ सकते हैं.
    "Auth" :{
"GoogleClientId": "",
"GoogleClientSecret": ""
}
आप कैसे कभी भी इन को स्रोत नियंत्रण में नहीं जाँचना चाहिए. स्थानीय विकास के बजाए आप गोपनीय फ़ाइल इस्तेमाल कर सकते हैं:
वहाँ में आप अपने गूगल क्लाएंट आईडी और गुप्त जोड़ सकते हैं (आपके ग्राहक Id वास्तव में गोपनीय नहीं है, के रूप में आप बाद में देखेंगे कि यह शामिल है सामने अंत पर कॉल में शामिल है.
    "Auth" :{
  "GoogleClientId": "ID",
  "GoogleClientSecret": "CLIENTSECRET"
}
ध्यान दीजिए कि मैं स्टीव स्मिथ ICaffgontiviviens के एक संशोधित संस्करण का प्रयोग करता हूँ (संत्र फिलेक द्वारा प्रसिद्ध किया गया है. यह मैं विकल्प चीजों से दूर रहने के लिए है जो मैं एक बिट बेडली मिल गया (और शायद ही कभी जरूरत है जब मैं अपने अतीत में तैनाती के बाद कभी कॉन्फ़िग नहीं बदल सकता.
मैं यह करने के लिए जो मुझे वर्ग से भाग नाम प्राप्त करने की अनुमति देता है:
namespace Mostlylucid.Config;
public static class ConfigExtensions {
public static TConfig ConfigurePOCO
    var config = new TConfig();
    configuration.Bind(config);
    services.AddSingleton(config);
    return config;
}

public static TConfig Configure<TConfig>(this WebApplicationBuilder builder)
    where TConfig : class, IConfigSection, new() {
    var services = builder.Services;
    var configuration = builder.Configuration;
    var sectionName = TConfig.Section;
    return services.ConfigurePOCO<TConfig>(configuration.GetSection(sectionName));
}


public static TConfig GetConfig<TConfig>(this WebApplicationBuilder builder)
    where TConfig : class, IConfigSection, new() {
    var configuration = builder.Configuration;
    var sectionName = TConfig.Section;
    var section = configuration.GetSection(sectionName).Get<TConfig>();
    return section;

}

public static Dictionary<string, object> GetConfigSection(this IConfiguration configuration, string sectionName) {
    var section = configuration.GetSection(sectionName);
    var result = new Dictionary<string, object>();
    foreach (var child in section.GetChildren()) {
        var key = child.Key;
        var value = child.Value;
        result.Add(key, value);
    }

    return result;
}

public static Dictionary<string, object> GetConfigSection<TConfig>(this WebApplicationBuilder builder)
    where TConfig : class, IConfigSection, new() {
    var configuration = builder.Configuration;
    var sectionName = TConfig.Section;
    return configuration.GetConfigSection(sectionName);
}
}
public interface IConfigSection { public static abstract string Section { get; } }
</details>
तो मेरी आथ की तरह दिखता है

```csharp
public class Auth : IConfigSection
{
    public static string Section => "Auth";
    public string GoogleClientId { get; set; }
    public string GoogleClientSecret { get; set; }

    public string AdminUserGoogleId { get; set; }

}
जहाँ मैं खण्ड नाम प्राप्त करने के लिए स्थिर इंटरफेस विधि का उपयोग करता हूँ.
तो फिर अपनी स्टार्टअप में मैं यह कर सकते हैं:
var auth = builder.GetConfig<Auth>();
किसी भी गोल सामान के लिए वापस!
असल में इस जोड़ने के लिए
services.AddCors(options =>
{
    options.AddPolicy("AllowMostlylucid",
        builder =>
        {
            builder.WithOrigins("https://www.mostlylucid.net")
                .WithOrigins("https://mostlylucid.net")
                .WithOrigins("https://localhost:7240")
                .AllowAnyHeader()
                .AllowAnyMethod();
        });
});

builder.Services
    .AddAuthentication(options =>
    {
        options.DefaultScheme = CookieAuthenticationDefaults.AuthenticationScheme;
        options.DefaultChallengeScheme = GoogleDefaults.AuthenticationScheme;


    })
    .AddCookie()
    .AddGoogle(options =>
    {
        options.ClientId = auth.GoogleClientId;
        options.ClientSecret = auth.GoogleClientSecret;
    });
आप यहाँ ConS प्रविष्टि को नोट करेंगे, आप भी इन सेट करने की जरूरत है इन चालल पहचान कंसोल में.
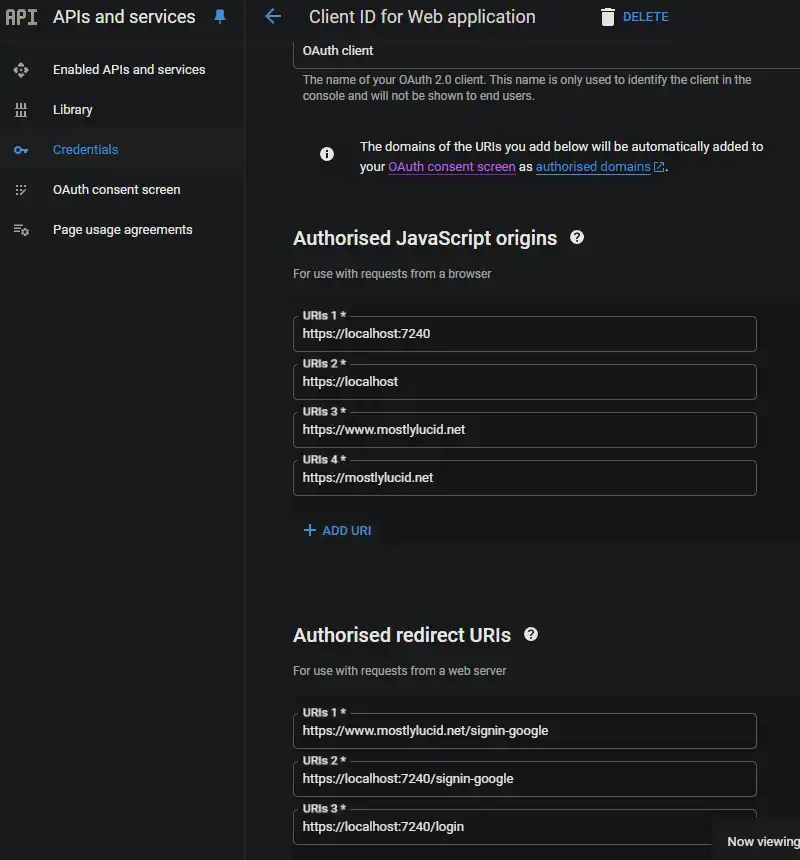
यह सुनिश्चित करता है कि गूगलA सिर्फ डोमेन से प्रयोग किया जा सकता है जिसे आपने निर्दिष्ट किया है.
मेरे में _खाका मेरे पास यह जावा- स्क्रिप्ट है, यह है जहाँ मैंने अपने गूगल बटनों को सेट किया है और एक कॉल कॉलर शुरू कर दिया है जो एनईसी एएस एएस एएस ए.टीएस.
<script src="https://accounts.google.com/gsi/client" async defer></script>
नीचे दिए गए कोड के लिए यह DOWO है
        function renderButton(element)
        {
            google.accounts.id.renderButton(
                element,
                {
                    type: "standard",
                    size: "large",
                    width: 200,
                    theme: "filled_black",
                    text: "sign_in_with",
                    shape: "rectangular",
                    logo_alignment: "left"
                }
            );
        }
        function initGoogleSignIn() {
            google.accounts.id.initialize({
                client_id: "839055275161-u7dqn2oco2729n6i5mk0fe7gap0bmg6g.apps.googleusercontent.com",
                callback: handleCredentialResponse
            });
            const element = document.getElementById('google_button');
            if (element) {
                renderButton(element);
            }
            const secondElement = document.getElementById('google_button2');
            if (secondElement) {
                renderButton(secondElement);
            }

        }

        function handleCredentialResponse(response) {
            if (response.credential) {
                const xhr = new XMLHttpRequest();
                xhr.open('POST', '/login', true);
                xhr.setRequestHeader('Content-Type', 'application/json');
                xhr.onload = function () {
                    if (xhr.status === 200) {
                        window.location.reload();
                    } else {
                        console.error('Failed to log in.');
                    }
                };
                xhr.send(JSON.stringify({ idToken: response.credential }));
            } else {
                console.error('No credential in response.');
            }
        }

        window.onload = initGoogleSignIn;
यहाँ पर आप देख सकते हैं कि मैं पृष्ठ के दो रिजो तत्वों के लिए कर सकते हैं आईडी Poole_bl_BAR_ बटन और बटन2 के साथ BAR यह वे तत्व हैं जो कि गूगल जेएस बटनों को इन बटनों को रेंडर करेगा.
TIP: यदि आप टिला का उपयोग कर रहे हैं, तो आप गहरे मोड में सही तरह से काम करने के लिए बटन को हामी भर सकते हैं (अन्यथात बटन के चारों ओर सफेद पृष्ठभूमि का अनुवाद)
<div class="w-[200px] h-[39px] overflow-hidden rounded">
    <div id="google_button">
    </div>
</div>
जावास्क्रिप्ट के ऊपर मैं इसे फिर से पोस्ट में लॉगइन कहा गया एक नियंत्रक क्रिया के लिए. यह है जहां मैं गूगल AHAH को संभाल.
      const xhr = new XMLHttpRequest();
                xhr.open('POST', '/login', true);
                xhr.setRequestHeader('Content-Type', 'application/json');
                xhr.onload = function () {
                    if (xhr.status === 200) {
                        window.location.reload();
                    } else {
                        console.error('Failed to log in.');
                    }
                };
                xhr.send(JSON.stringify({ idToken: response.credential }));
नियंत्रक यहाँ बहुत सरल है यह सिर्फ पोस्टर जेओटी लेता है, तो यह जारी रखने के लिए उपयोग करता है कि ए.
    [Route("login")]
        [HttpPost]
        public async Task<IActionResult> HandleGoogleCallback([FromBody] GoogleLoginRequest request)
        {
            var handler = new JwtSecurityTokenHandler();
            var jsonToken = handler.ReadToken(request.IdToken) as JwtSecurityToken;

            if (jsonToken == null)
            {
                return BadRequest("Invalid token");
            }

            var claimsIdentity = new ClaimsIdentity(
                jsonToken.Claims,
                GoogleDefaults.AuthenticationScheme);

            var authProperties = new AuthenticationProperties
            {
                IsPersistent = true
            };

            await HttpContext.SignInAsync(
                CookieAuthenticationDefaults.AuthenticationScheme,
                new ClaimsPrincipal(claimsIdentity),
                authProperties);

            return Ok();
        }
    }
ध्यान दीजिए: यह दावा के अनुसार नहीं है (वे सभी कम मामले हैं) लेकिन यह अब के लिए काम करता है.
मेरे आधार नियंत्रणर में मैं मैं जरूरत गुण निकाल,
      public record LoginData(bool loggedIn, string? name, string? avatarUrl, string? identifier);

    protected LoginData GetUserInfo()
    {
        var authenticateResult = HttpContext.AuthenticateAsync(CookieAuthenticationDefaults.AuthenticationScheme).Result;
        if (authenticateResult.Succeeded)
        {
            var principal = authenticateResult.Principal;
            if(principal == null)
            {
                return new LoginData(false, null, null, null);
            }
            var name = principal.FindFirst("name").Value;
            var avatarUrl =principal.FindFirst("picture").Value;
            var nameIdentifier = principal.FindFirst("sub");
            return new LoginData(true, name, avatarUrl, nameIdentifier?.Value);
        }
        return new LoginData(false,null,null,null);
    }
और यह है! यह आपको सीआईएई का उपयोग किए बगैर गैंडल प्रमाणीकरण का उपयोग करने देता है. एनईटी पहचान डाटाबेस.
