NOTE: Apart from

You can see how this translation was done in this article.
Tuesday, 13 August 2024
//3 minute read
ImageSharp is a powerful image processing library that allows you to manipulate images in a variety of ways. ImageSharp.Web is an extension of ImageSharp that provides additional functionality for working with images in ASP.NET Core applications. In this tutorial, we will explore how to use ImageSharp.Web to resize, crop, and format images in this application.
To get started with ImageSharp.Web, you will need to install the following NuGet packages:
dotnet add package SixLabors.ImageSharp
dotnet add package SixLabors.ImageSharp.Web
In our Program.cs file we then set up ImageSharp.Web. In our case we are referring to and storing our images in a folder called "images" in the wwwroot of our project. We then set up the ImageSharp.Web middleware to use this folder as the source of our images.
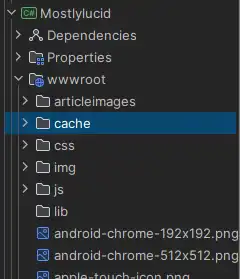
ImageSharp.Web also uses a 'cache' folder to store processed files (this prevents it reporcessing files each time).
services.AddImageSharp().Configure<PhysicalFileSystemCacheOptions>(options => options.CacheFolder = "cache");
These folders are relative to the wwwroot so we have the following structure:

ImageSharp.Web has multiple options for where you store your files and caching (see here for all the details: https://docs.sixlabors.com/articles/imagesharp.web/imageproviders.html?tabs=tabid-1%2Ctabid-1a)
For example to store your images in an Azure blob container (handy for scaling) you would use the Azure Provider with AzureBlobCacheOptions:
dotnet add SixLabors.ImageSharp.Web.Providers.Azure
// Configure and register the containers.
// Alteratively use `appsettings.json` to represent the class and bind those settings.
.Configure<AzureBlobStorageImageProviderOptions>(options =>
{
    // The "BlobContainers" collection allows registration of multiple containers.
    options.BlobContainers.Add(new AzureBlobContainerClientOptions
    {
        ConnectionString = {AZURE_CONNECTION_STRING},
        ContainerName = {AZURE_CONTAINER_NAME}
    });
})
.AddProvider<AzureBlobStorageImageProvider>()
Now that we have this set up it's really simple to use it inside our application. For example if we want to serve a resized image we could do either use the TagHelper or the specify the URL directly.
TagHelper:
<img
    src="sixlabors.imagesharp.web.png"
    imagesharp-width="300"
    imagesharp-height="200"
    imagesharp-rmode="ResizeMode.Pad"
    imagesharp-rcolor="Color.LimeGreen" />
Notice that with this we're resizing the image, setting the width and height, and also setting the ResizeMode and recoloring the image.
In this app we go the simpler way and just use querystring parameters. For the markdown we use an extension which allows us to specify the image size and format.
    public void ChangeImgPath(MarkdownDocument document)
    {
        foreach (var link in document.Descendants<LinkInline>())
            if (link.IsImage)
            {
                if(link.Url.StartsWith("http")) continue;

                if (!link.Url.Contains("?"))
                {
                   link.Url += "?format=webp&quality=50";
                }

                link.Url = "/articleimages/" + link.Url;
            }

    }
This gives us the felxibility of either specifying these in the posts like

Where this image will come from wwwroot/articleimages/image.jpg and be resized to 50% quality and in webp format.
Or we can just use the image as is and it will be resized and formatted as specified in the querystring.
Note the cache forlder I've used above needs to be writable by the application. If you're using Docker you'll need to make sure this is the case.
See my earlier post for how I manage this using a mapped volume.
As you've seen ImageSharp.Web gives us a great capability to resize and format images in our ASP.NET Core applications. It's easy to set up and use and provides a lot of flexibility in how we can manipulate images in our applications.